Causes of Cabinet Paint Scratches: Cabinet Paint Scratches Off

Cabinet paint scratches are a common problem, often marring the beauty of a kitchen or bathroom. Understanding the reasons behind these scratches can help prevent them and maintain the pristine look of your cabinets.
Types of Cabinet Paint Scratches, Cabinet paint scratches off
The nature of cabinet paint scratches can vary depending on the force applied and the type of surface involved.
- Light Surface Scratches: These are shallow scratches that only affect the top layer of paint. They are usually caused by light friction, such as from cleaning with abrasive sponges or bumping into the cabinets with objects.
- Deep Gouges: These scratches are deeper and can reach the wood underneath the paint. They are often caused by sharp objects, such as knives or keys, or by heavy impacts.
- Peeling Paint: This occurs when the paint starts to detach from the surface, often due to moisture or improper application. Scratches can accelerate peeling by creating a weak point for the paint to separate.
Factors Affecting Scratch Resistance
The type of paint used and the finish applied to the cabinets significantly impact their scratch resistance.
- Paint Type: Epoxy paints are known for their durability and resistance to scratches. Acrylic paints, while less durable, offer a wide range of colors and finishes. Oil-based paints are generally more scratch-resistant than water-based paints.
- Finish: A glossy finish provides a harder surface than a matte finish, making it more resistant to scratches. However, gloss finishes can show scratches more prominently.
- Material: Cabinets made of hardwood are generally more durable than those made of softwood. Hardwood cabinets are less prone to dents and scratches, although they can still be scratched.
Preventing Cabinet Paint Scratches
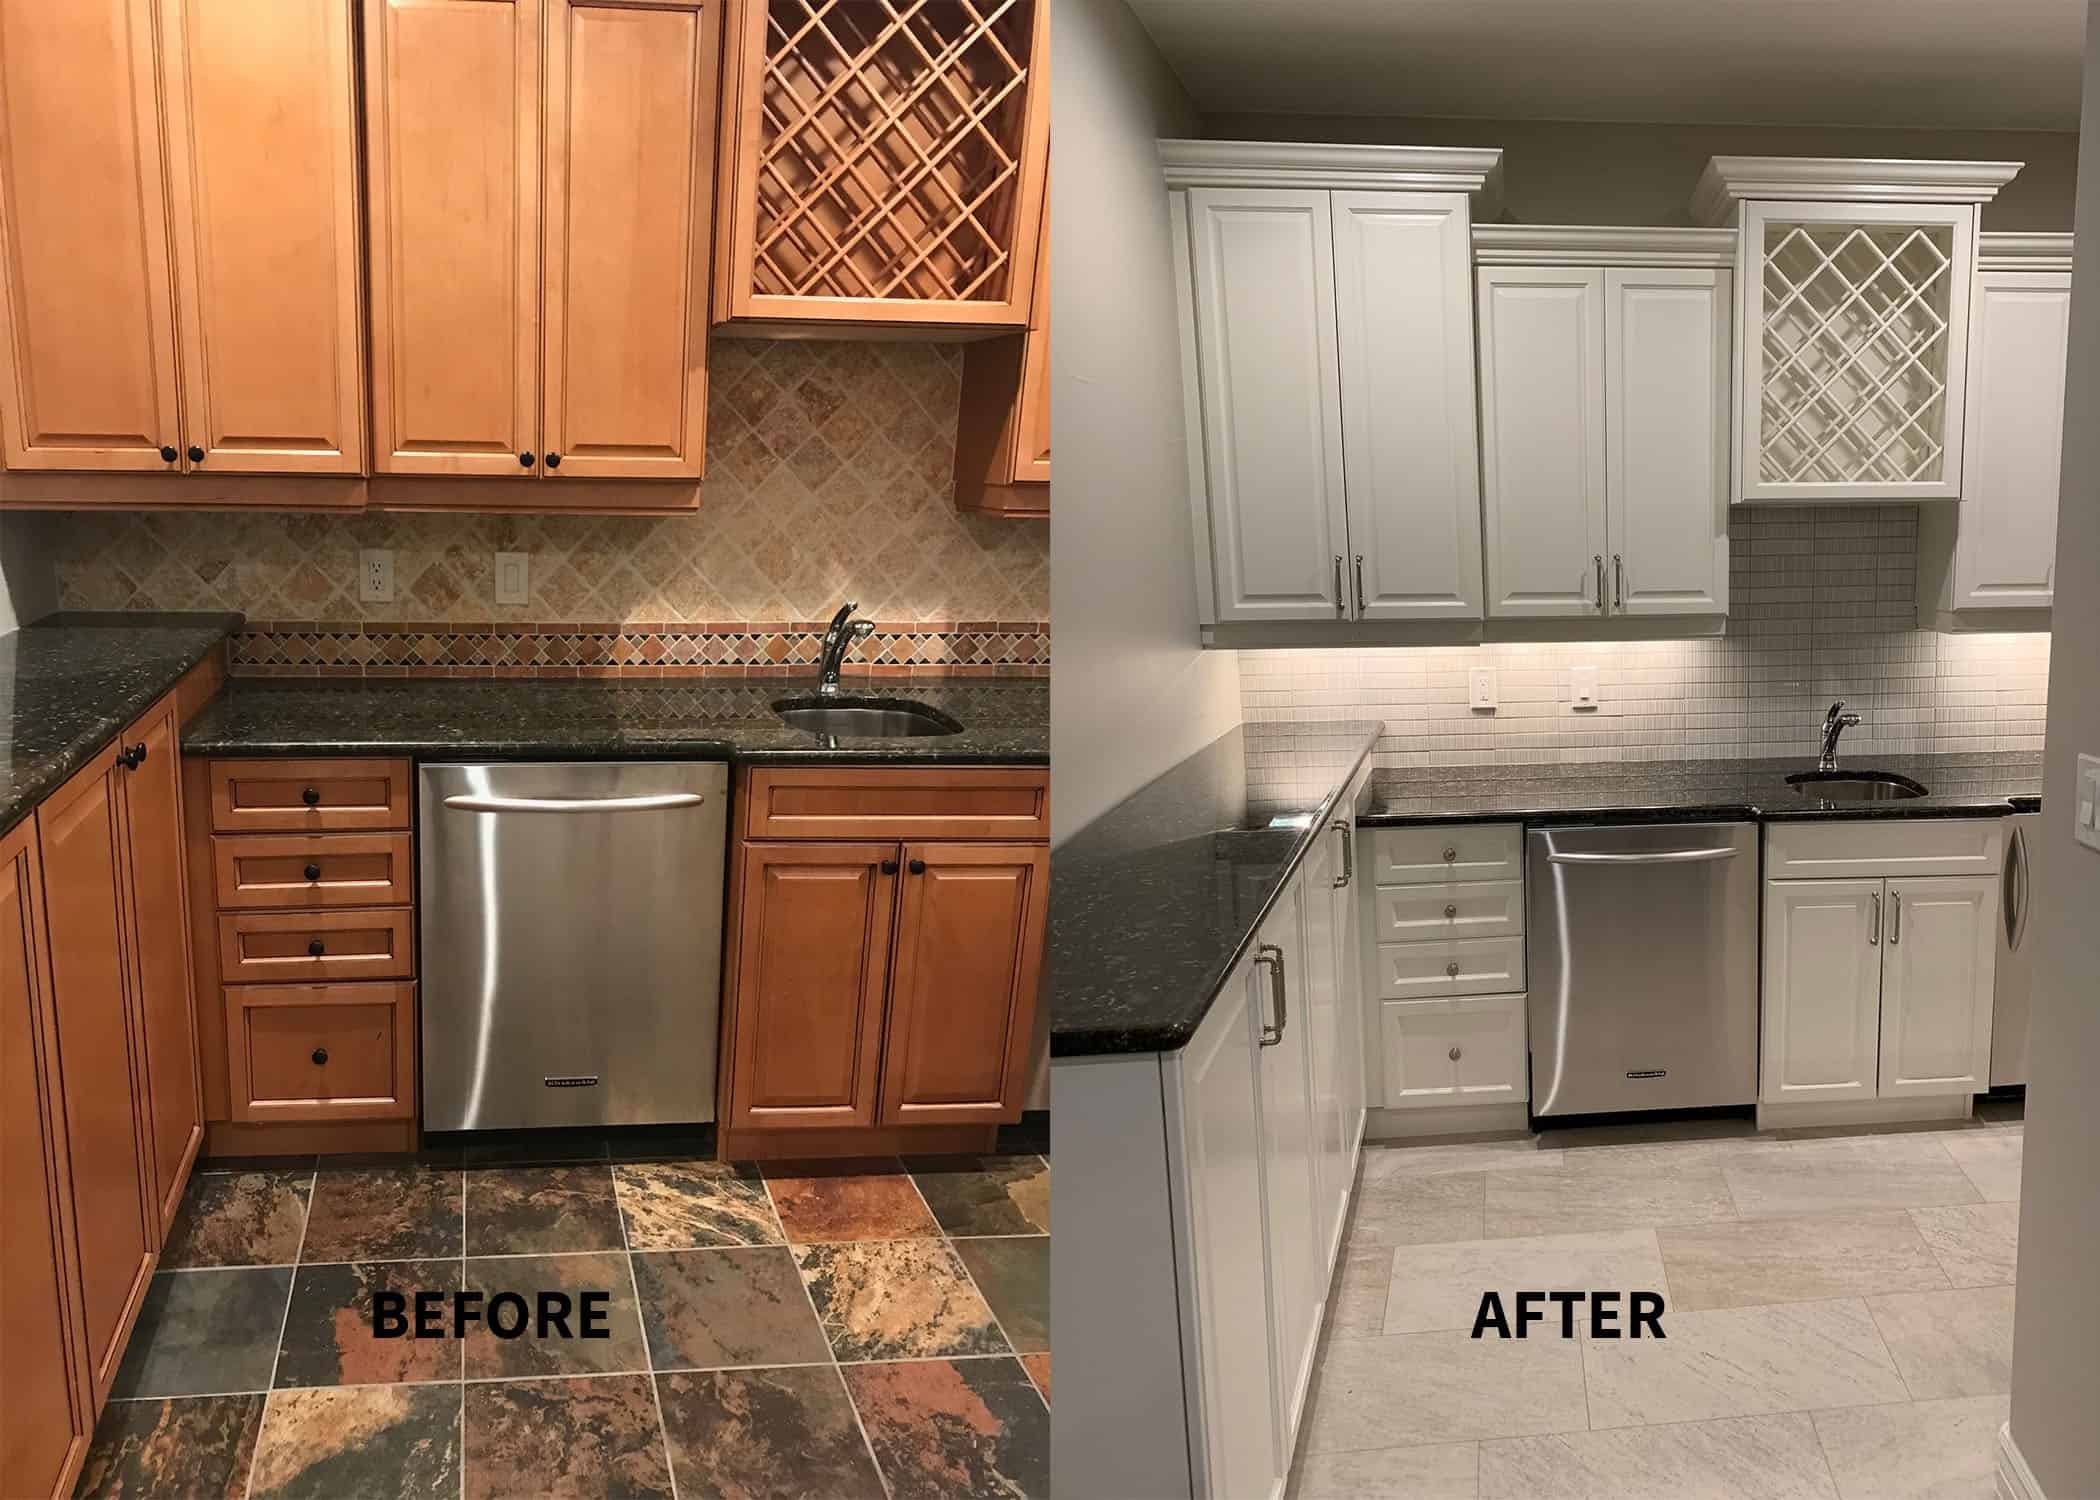
A well-painted kitchen can be a source of pride, adding a touch of elegance and vibrancy to your home. However, the beauty of your cabinets can be marred by unsightly scratches, diminishing their appeal and leaving you with a feeling of disappointment. Fear not, for there are practical steps you can take to protect your painted cabinets and preserve their pristine appearance.
Protecting Cabinet Paint from Scratches During Daily Use
A proactive approach to protecting your cabinets from scratches is essential. Daily use can lead to wear and tear, but with a few simple strategies, you can minimize the risk of scratches.
- Gentle Handling: When opening and closing cabinet doors, do so with care and avoid forceful movements.
- Protective Barriers: Consider installing cabinet door bumpers to absorb impact and prevent scratches.
- Strategic Placement: Place heavy items towards the back of shelves, minimizing the potential for scratches from sharp edges.
- Soft Cleaning Tools: Opt for microfiber cloths or soft sponges for cleaning, as harsh scrubbing can damage the paint.
Proper Cleaning and Maintenance of Painted Cabinets
Regular cleaning and maintenance are crucial to keep your painted cabinets looking their best. A consistent cleaning routine will help prevent dirt, grime, and food spills from scratching the paint.
- Dust Regularly: Use a soft, dry cloth to dust your cabinets frequently, removing any dust particles that could cause scratches.
- Gentle Cleaning Solutions: For deeper cleaning, use a mild dish soap solution and a soft sponge. Avoid harsh chemicals or abrasive cleaners that can damage the paint.
- Avoid Excess Water: Do not soak your cabinets with water, as this can seep into the wood and damage the paint.
- Dry Thoroughly: After cleaning, dry your cabinets thoroughly with a soft cloth to prevent watermarks or streaks.
Using High-Quality Paint and Primers for Long-Lasting Protection
The foundation for durable and scratch-resistant paint lies in the quality of the paint and primer used. Investing in high-quality materials will provide a protective barrier and enhance the longevity of your paint job.
- Primer: A good primer acts as a bonding agent, creating a smooth surface for the paint to adhere to. Choose a primer specifically designed for cabinets and ensure it is compatible with the type of paint you intend to use.
- Paint: Opt for a high-quality, durable paint designed for cabinets. Consider using a paint with a semi-gloss or satin finish, as these offer greater scratch resistance than matte finishes.
- Multiple Coats: Apply multiple thin coats of paint for optimal coverage and durability. Allow each coat to dry completely before applying the next.
Repairing Scratched Cabinet Paint
The appearance of your cabinets can be significantly impacted by scratches, but fear not, as these blemishes can be effectively repaired with a little effort and the right techniques. This section will guide you through various methods to restore your cabinets to their former glory, whether you’re dealing with minor scratches or deeper wounds.
Repairing Minor Scratches with Touch-Up Paint
Minor scratches, which are typically superficial and only affect the top layer of paint, can be addressed with a simple touch-up solution. This method involves using a small brush to apply paint that matches the existing color of your cabinets, effectively concealing the scratch.
- Clean the scratched area with a damp cloth to remove dust and debris.
- Apply a small amount of touch-up paint to the scratch, using a brush that is appropriate for the size of the scratch.
- Allow the paint to dry completely before applying a second coat if necessary.
- Once the paint is dry, lightly sand the area with fine-grit sandpaper to blend the touch-up paint with the surrounding surface.
- Clean the area again to remove any sanding dust.
Sanding and Repainting Damaged Areas
For more prominent scratches that penetrate beyond the top layer of paint, a more comprehensive approach is required. This method involves sanding the damaged area to create a smooth surface and then applying a fresh coat of paint to cover the scratch completely.
- Start by sanding the scratched area with medium-grit sandpaper to remove the damaged paint and create a smooth surface.
- After sanding, use a damp cloth to wipe away any dust or debris.
- Apply a primer to the sanded area to create a smooth and even surface for the new paint.
- Allow the primer to dry completely before applying two coats of paint, ensuring that each coat dries completely before applying the next.
- Once the paint is dry, lightly sand the area with fine-grit sandpaper to blend the repainted area with the surrounding surface.
- Clean the area again to remove any sanding dust.
Repairing Deep Scratches
Deep scratches, which extend into the wood beneath the paint, require a more specialized approach. Two common methods are filling the scratch with wood filler or using a paint scraper.
- Filling with Wood Filler: Wood filler is a paste-like substance that is applied to the scratch and allowed to dry. Once dry, it can be sanded smooth and painted over to match the surrounding surface.
When using wood filler, ensure that the filler is compatible with the type of wood you are working with and that it is allowed to dry completely before sanding and painting.
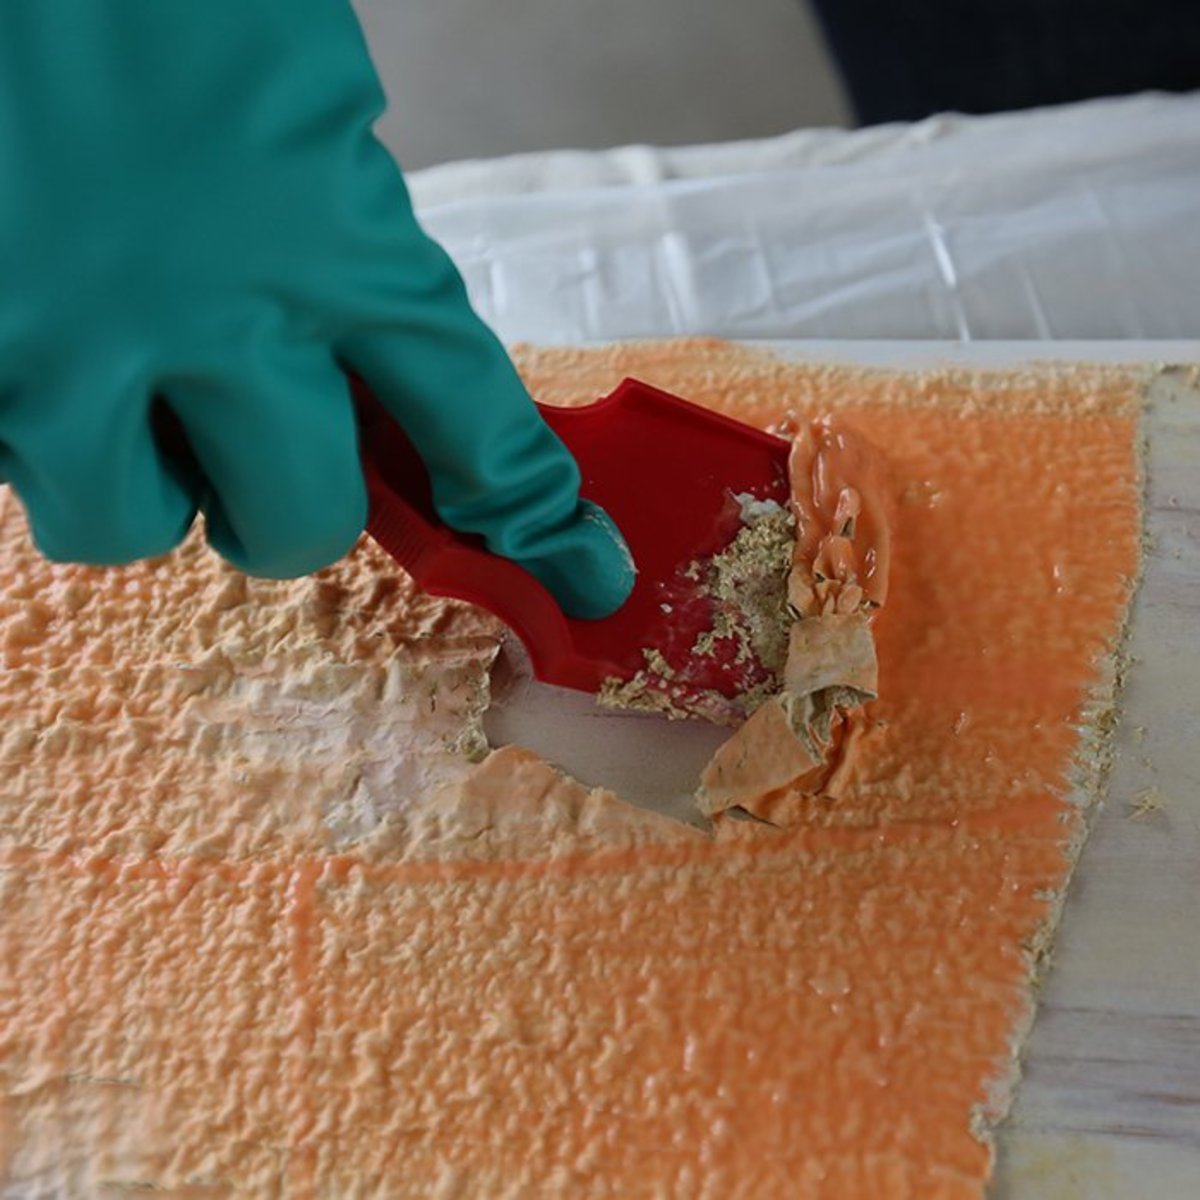
- Using a Paint Scraper: A paint scraper is a tool used to remove damaged paint from the surface of the wood. This method is effective for deep scratches that have exposed the wood beneath the paint.
When using a paint scraper, be careful not to damage the surrounding surface and ensure that the scraper is sharp and in good condition.
Cabinet paint scratches off – Ugh, those cabinet paint scratches are driving me crazy! It’s like they’re mocking my efforts to keep things looking fresh. While I’m at it, I should probably check out that squeaky bedroom door hinge. This guide seems like it might have some helpful tips.
Once I’ve tackled that, maybe I’ll finally get around to touching up those paint scratches.
Ugh, cabinet paint scratches are the worst! It’s like they’re mocking you every time you look at them. While you’re dealing with that, you might want to consider upgrading your master bedroom’s ceiling fan. This guide can help you pick the right size for your space, so you can enjoy a cool breeze while you’re fixing those scratches.
At least you’ll have a cool head while you’re dealing with those annoying scratches!

